There are quite a few use cases for wanting to convert a Windows installation to a virtual machine image; maybe you want to run tests on the virtual image afterwards, for instance to run an update to see how it goes. Or, you want to use the image as an option to access data from an old machine that you won't use anymore after the conversion.
Most virtualization products support the conversion of live Windows installations to virtual machine images. Some come with the required tools so that you only need to run them, others are available as third-party programs that you need to run and use instead.
This guide offers instructions on converting Windows installations to Microsoft Hyper-V, VirtualBox and VMware virtual images.
VHDX Format -- Microsoft Hyper-V

The conversion of a live Windows system to a Microsoft Hyper-V virtual machine image is very easy thanks to Sysinternals excellent Disk2vhd program for Windows.
The program is portable, and you can run it from any location after you have extracted its archive. The program requires elevation, but can be used to create a virtual machine copy of one, some or all available volumes of the PC it is run on.
Tip: you can run the program from the command line as well using the format disk2vhd <[drive: [drive:]...]|[*]> <vhdfile>.
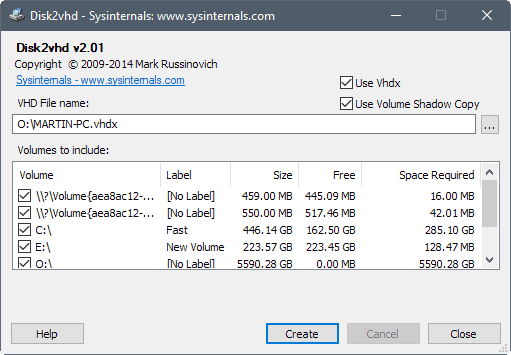
The application displays the destination path and file name in its interface, and below that the available volumes. Please note that you need to pick a destination with enough free storage space as the process won't complete successfully otherwise.
All that you need to do is select the output path and file name (with the vhdx extension), and pick the volumes that you want to be included in the virtual image.
You can select only the Windows partition if you only need it, or others as well. In fact, you can also turn other partitions into VHD images without selecting the Windows partition.
Disk2VHD comes with two additional options which are both selected on start. The first sets the output format to the newer VHDX format. You can disable the option to create a VHD format image instead.
VHDX offers several advantages such as support for larger virtual disks (64 TB vs 2TB), better corruption protection, 4K disk alignment, online resizing, and more. VHD is needed mostly for compatibility purposes, for instance when a product does not support VHDX but also when you want to convert the image to Virtualbox (see Virtualbox chapter for that).
Tip: Check out Microsoft's article on the differences between VHD and VHDX.
The second option enables the use of volume shadow copy.
Disk2VHD processes the selected volumes and turns them into virtual disk images that are stored in the selected location.
VDI Format --VirtualBox

VirtualBox comes without option to convert a live Windows environment directly to a compatible virtual disk image.
You can use a workaround however to achieve that. First thing you need to do is create a VHD image as detailed in the Microsoft Hyper-V guide above.
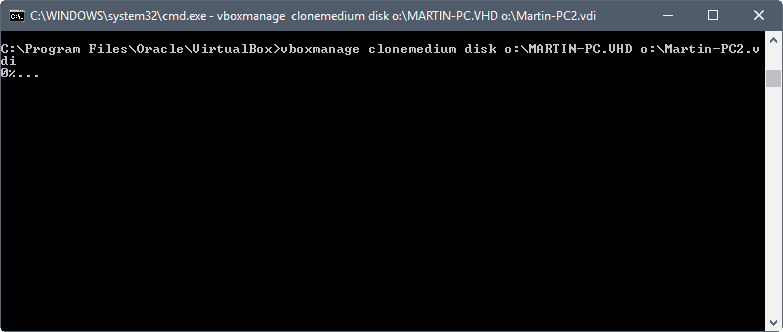
Once you have the VHD image, you may use the vboxmanage command line tool that comes with VirtualBox to clone the medium and save it in a different format.
- Tap on the Windows-key, type cmd.exe, hold down the Ctrl-key and the Shift-key, and hit the Enter-key to launch an elevated command prompt.
- Navigate to the VirtualBox folder on the system, e.g. c:\program files\Oracle\VirtualBox using the cd command.
- Use the command vboxmanage clonemedium disk [source] [destination] to convert the VHD disk image to VDI format. Example: vboxmanage clonemedium disk o:\source.vhd o:\output.vdi
The conversion may take a while depending on the size of the image and the available resources.
VMX Format -- VMware

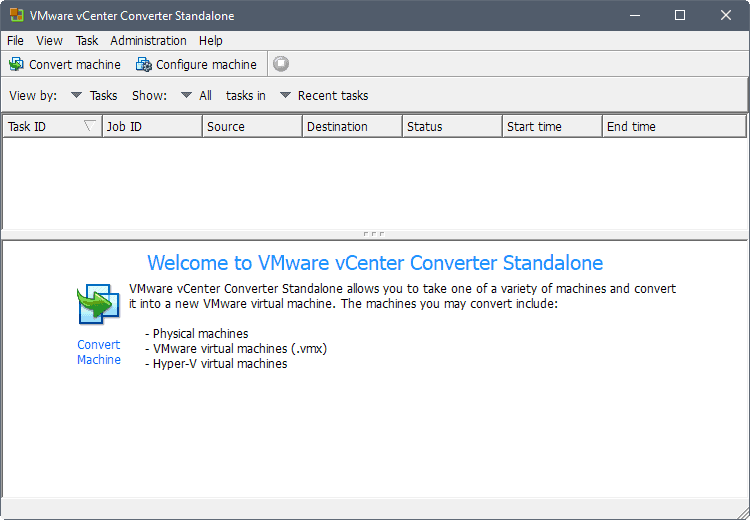
You can create VMware virtual images of Windows machines using VMware vCenter Converter. You can download the program from the official VMware website, but it requires an account to do so.
Third-party download sites like Softpedia host the download as well, so download it from there directly and without having to create an account prior to that.
Note: The program creates a virtual image of the full machine. There is no option in the GUI to deselect hard drives or partitions.
The installer has a size of 170 Megabytes, and will display an option to join the customer experience program during installation.
To convert the running Windows system to a virtual image for VMware, click on the "convert machine" option in the program's main interface to get started.
A wizard is loaded; make sure the source type is set to "powered on" and "this local machine". You can create virtual images of remote machines as well, but need to specify the machine's host name or IP address, as well as username and password to do so.
Select VMware virtual machine under destination type on the next page, and set a destination folder for the image as well on it.
The creation may take a while to complete depending on the number of volumes, size and the device's resources.
Closing Words
It is relatively easy to create a virtual disk image from a Windows installation. The easiest option is offered by Sysinternals' Disk2VHD program as it is lightweight and converts the installation rather quickly to one of the supported formats.
Now You: Do you work with virtual images?

Comments
Post a Comment
Please comment your views and ideas.